Importing Network Files

Hydraulic Networks (the word Network in this manual refers to Hydraulic Networks unless otherwise specified) can be imported from other design software in the following formats:

Importing CSV & TXT files

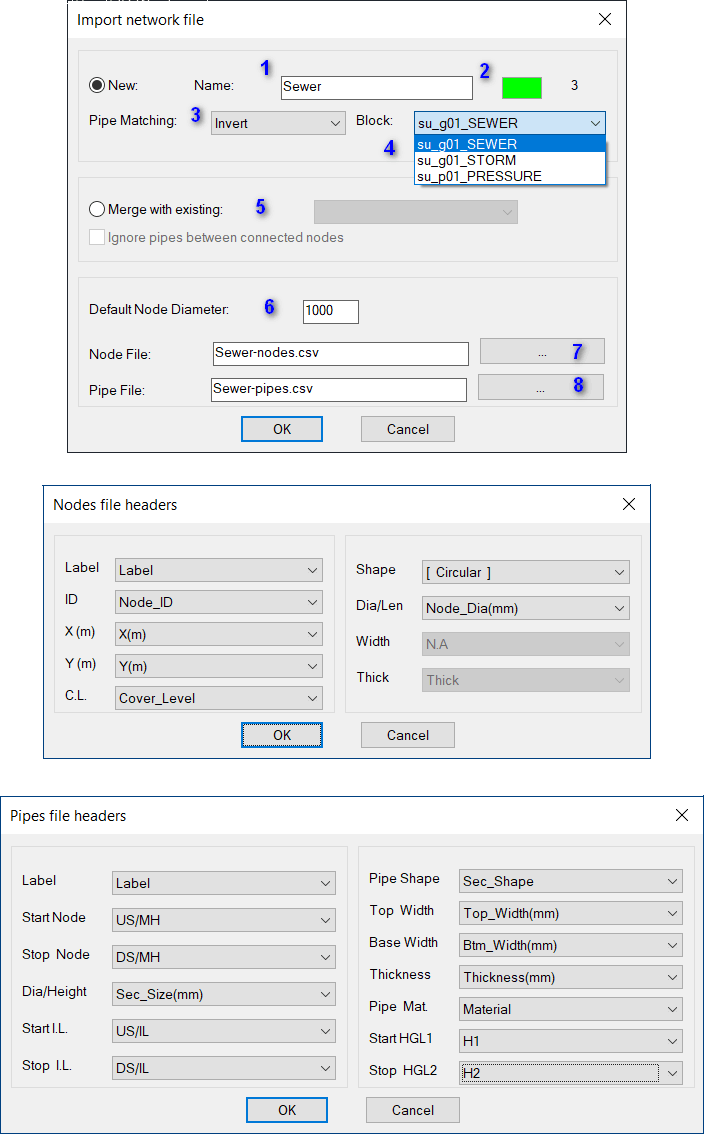
1- Type network name (keep it short and informative without special characters)
2- Select a color for the network layer (all pipes and nodes will be drawn in a layer called “-Network”. The layer name can be changed later)
3- Select connection type of pipes (the program will try to keep the pipes connected per this setting)
4- Select node block, it is important to select the node block correctly as it will contain all the structure shapes.
5- If the network already exist, imported elements will be added to it if this option selected.
6- If structure size (diameter) not found, it can be set here (units is mm)
7- Browse and select the nodes input file, CSV (comma delimited or TXT (tab delimited). The program will try to figure out the required headers and display the best guess as shown below, the user must check and correct the headers before pressing OK
Note: The ID of the node is required as it will be used to connect the pipes, but the label can be anything, if not exist ID field can be used.
8- Browse and select the pipe input file, CSV (comma delimited or TXT (tab delimited).
Again, the program will do the same as the above.

Note: if section details not available the pipes will be assumed circular.

Import CSV and Text

Importing EPANET files

EPANET network files
EPANET files (INP) are used to import pressure networks.
1- Type in network name.
2- Select pipes in layout layer color.
3- Connection type
4- Dynamic block to be used in the layout to draw structures (nodes), the software comes with a few blocks but users can create their own.
5- Merge with existing networks if any, note that existing node will not be imported and pipes connecting two old nods will be ignored.
6- Soil Cover is required to calculate either the ground level, if 7 is pipe level (crown or center) or pipe level, if 7 is ground level.
7- Since EPANET provide only one level at nodes, it’s important to specify what this level is, ground or pipe.
8- To Show Direction Arrow if checked.
9- Normally EPANET file does not provide node diameters, the value in this field will be assigned to all nodes, this may not be correct since many nodes are of the type fitting or bend and their diameter need to be set to 0, this can be done later.
10- Browse to INP file.
Note: Pipes in EPANET files can have multiple vertices unlike CSV or XML format where only straight pipes between 2 nodes are allowed.

Importing EPANET (inp)

Importing LandXML files

LandXML files can be imported,
1. Type of pipes connected to each other via structures (nodes), can be set later from Network Properties.
2- Dynamic block to be used in the layout to draw structures (nodes), the software comes with a few blocks but users can create their own.
3- Select pipes in layout layer color.
4- XML file may contain more than one network, select the one to be imported here.
5- Network name is already provided in the XML file but it can be overridden here.
6- Imported networks can be merged with an existing network in the drawing. select which one here, if any.
7- In case the diameter units where not mentioned in the file, user can use this drop list to define the correct units.
8- If structure diameters not given, default value can be set here. 

Importing XML

© Copyright 2021 Ai Productions - All Rights Reserved

This web page was started with Mobirise